Network Connection Configuration for Mac OS X
The below guide has been tested on Mac OS X 10.6 (Snow Leopard) and 10.7 (Lion). Screenshots are taken from Lion thus may slightly differ from other versions.
Please Note: tipically on Mac OS X network settings are automatically configured by the system. In case of problems, you may follow the steps below to carry out a manual configuration:
Pre-requistes
- You must have full Administrator rights;
- It is advised to setup a network connection configuration profile (Location) specific to the EUI;
- It is advised to be already phisically connected to the EUI network, either via wired (suggested) or wireless connection.
Procedure
- Via Apple menu, got to System Preferences... > Network:

Figure 1: System Preferences
- If not already done so, create a specific Location for EUI's network connection configuration profile and select it:

Figure 2: Selecting a proper location
- The left side of the Network pane will display a list of network ports (interfaces) that are part of this location (e.g. Ethernet, Wi-Fi, FireWire, etc.). These include both physical ports, and virtual ports (e.g. VPN). You will need to configure both the Ethernet and the Wi-Fi ports separately one by one;
- Make sure the Wi-Fi port is Off then select the Ethernet port.
Please Note: at this step it is advised for your Mac to be physically attached to the campus network using the network port you are currently configuring (e.g. if you are configuring an Ethernet port, ensure the Ethernet cable is attached. If you are configuring a Wireless port, ensure you are within range of any EUI wireless area.
- The main Network pane now displays some of the settings for the selected network port within the current location. The information shown below may change depending on whether you are connected or not to the EUI network:
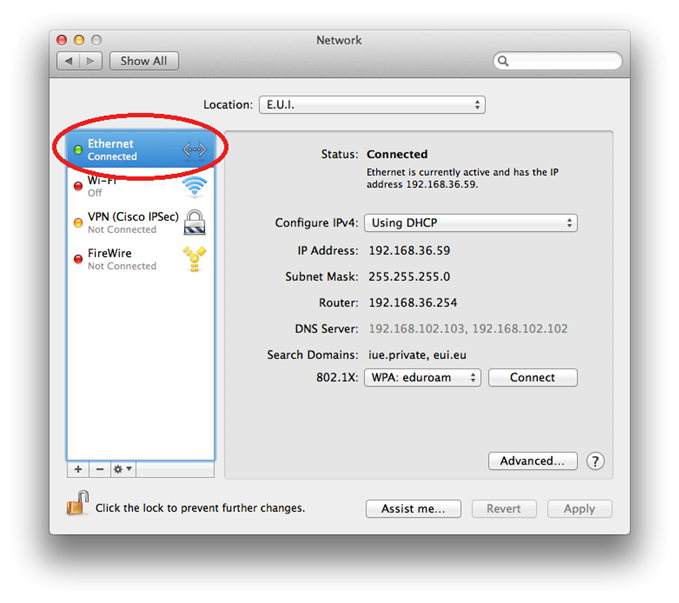
Figure 3: Ethernet network settings
- Click on Advanced... to bring up the advanced settings pane;
- In the TCP/IP tab, configure settings as follows then click OK to confirm:
Configure IPv4 = Using DHCP
Configure IPv6 = Automatically
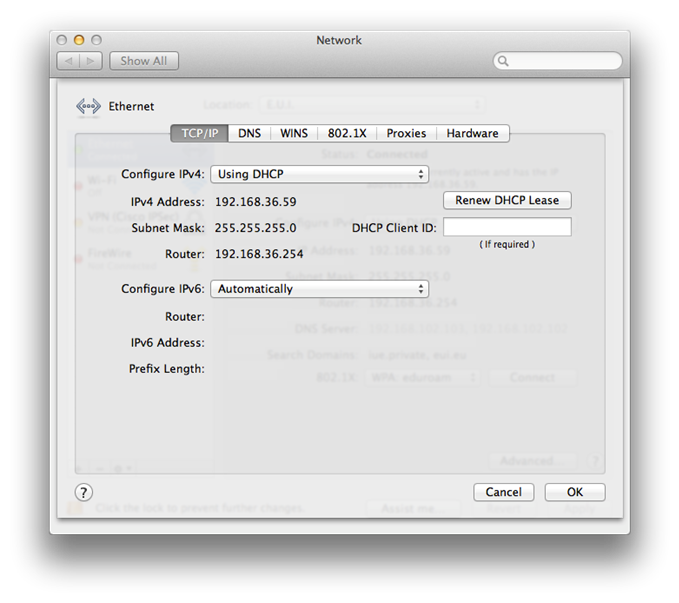
Figure 4: TCP/IP settings
- in the DNS tab, configure as follows then click OK to confirm:
DNS Servers:
Click on the + symbol then type 192.168.102.103. Repeat once and type 192.168.102.102.
Search Domains:
Click on the + symbol and type iue.private. Repat once and type eui.eu.
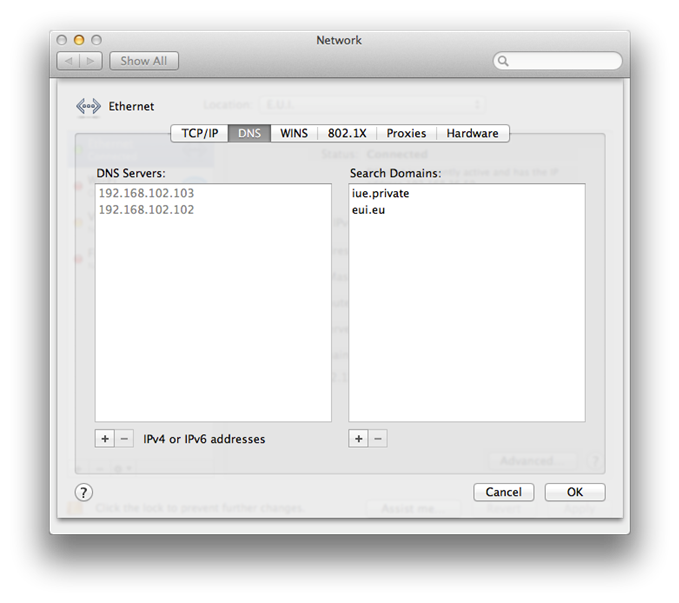
Figure 5: DNS settings
- In the WINS tab, configure as follows then click OK to confirm:
NetBIOS Name = [choose an arbitrary name for your Mac, whatever makes sense to you: e.g. MAC8686]
Workgroup = [choose an arbitrary group for your Mac, whatever makes sense to you: e.g. ECO]
WINS Servers:
Click on the + symbol and type i192.168.103.115. .
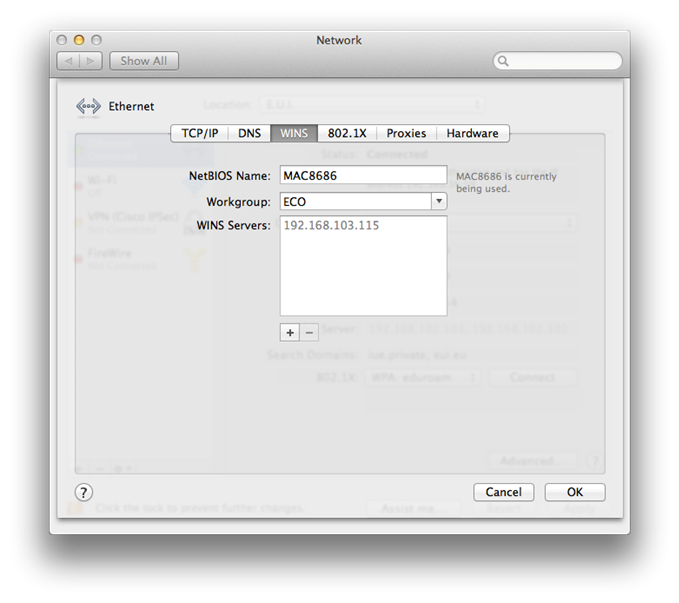
Figure 6: WINS settings
- At this point, you should be done configuring the advanced settings for all the tabs displayed for the current network port: click the OK to return to the basic settings for this network port.
-
Click Apply to save and apply changes to the configuration for thie Ethernet port.
Please Note: you may be prompted for your Mac password to allow to apply and save the changes.
-
Now select the Wi-Fi port and repeat steps from 5) onwards.
Your Mac is now configured to correctly connect to EUI's network.
Page last updated on 20 August 2017