This page is maintained by the software tutors. For errors and/or amendments please contact the current tutor supporting the program.
This guide will provide an easy to read, starter guide to EndNote. It is not intended to replace the full user manual provided from Thomson Reuters EndNote´s webpage.
For any further questions or assistance feel free to contact the EndNote software tutor.
EndNote is one of the most used softwares for easily creating, inserting, editing and organizing references, search bibliographic databases and organizing libraries, PDFS, images and inserting or modifying bibliographic styles /editing citations.
In EndNote X5 there are ease to use and powerful tools that will allow you to create your own reference library and to easily insert citations to your writings.
You can save time correctly creating automatic bibliographic style citations and changing from any citation style to another with just a click of your mouse.
EndNote X5 runs in Mac OS X (Leopard 10.5.x, Snow Leopard 10.6.x or Lion 10.7.x) or MS Windows (Windows XP SP3, Windows Vista or Windows 7) and is fully compatible with Microsoft Word 98 SP1 to 2011, Apple Pages '09, OpenOffice.org Writer 3 and Mathematica 8.
OS X
EndNote X5 requires:
- Mac OS X 450 MHz or higher
- At least 400 MB of free space on your hard disk
- A minimum of 256 MB RAM
MS Windows
EndNote X5 requires:
- At least 400 MB of free space on your hard disk
- A minimum of 256 MB RAM
Please check here for details.
How to Get the Software
EndNote is installed on all PCs running the Research Configuration (tipically Computer Rooms and computers assigned to Fellows).
The current version of the software is detailed here.
If you are running on a Staff Configuration (tipically Office PCs) and want to use the software, after having checked if you are eligible, please contact the EUI Helpdesk.
A fully licensed copy of EndNote is included with the “Welcome DVD”. You can get your “Welcome DVD” from the EUI ICT Service: for further details click here.
Once you have correctly installed EndNote X5 (just follow the installation steps) you will see the following screen when opening for first time EndNote:
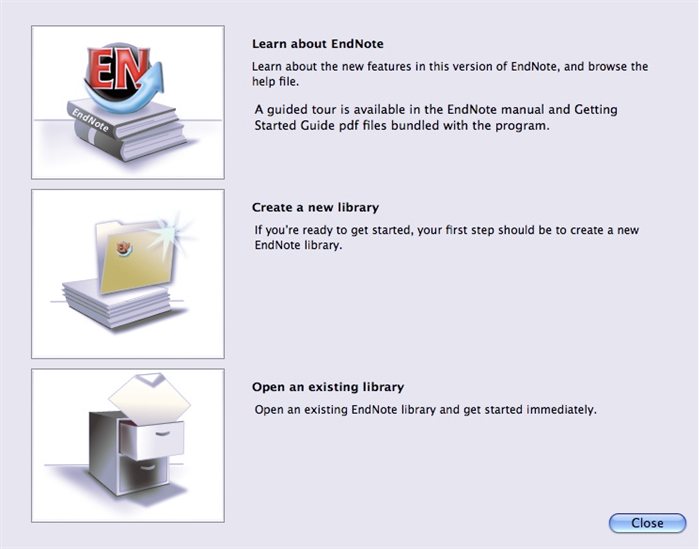
On this screen you can choose different options. If you are using EndNote for the first time and you do not have any libraries to import you should choose the second option available: “Create a new library” to start using EndNote and create your own personal library.
Otherwise, if you have your own EndNote compatible library you should choose the third option: “Open an existing library” to import it to your newly installed EndNote X5.
How to Use the Software
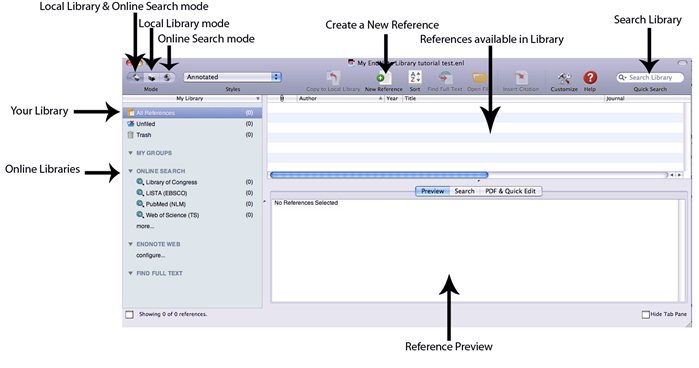
At first sight you will notice that EndNote main window is divided in 3 panels and a toolbar with basic commands.
The left side panel shows an easy to use organization of your personal library and online libraries catalogs.
The right top panel shows the library contents that can be ordered by several different options (Author, Year, Title, Journal, etc.)
The right bottom panel allows you to preview the references in any output bibliographic style as well as preview any of the PDFS attached to the specific references.
On the top section of the main window you can see a basic toolbar that will allow you to quickly access to some of the most frequently used options such as “New Reference”, “Sort”, “Insert Citation”, selecting the type of working mode (“Local Library & Online Search mode”, “Local Library mode”, “Online Search mode”), etc.
See the following image for a better understanding (more in-depth instructions on how to use each option will be explained ahead on this tutorial).
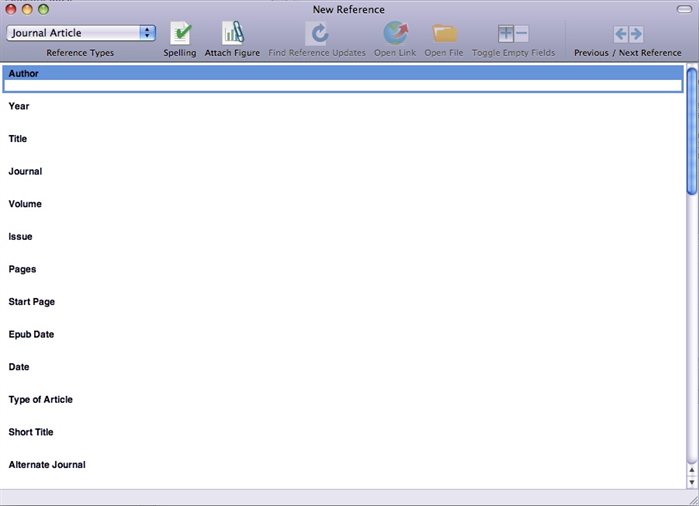
To create New References click on “New Reference” on the toolbar and a new window will pop-up. (The following steps are vital for an accurate library)
On this window you should firstly choose the type of reference you are creating from the list on the top left side of the panel (for example, Journal Article, Book, Book Section, Newspaper Article, Electronic Article, Webpage, etc.)
You will notice that every selection of “Reference Type” changes the fields to be completed, so be sure you are selecting the correct type of reference.
Once you have chosen the “Reference Type” you can start completing the fields (Author, Year, Title, etc.). At this point you can also attach a chart or image to the reference (if it is the case) by clicking on “Attach Figure”.
After filling the empty fields you must save the reference either by clicking “File?Save”, or by closing the window of the reference because in that moment EndNote will ask you if you want to save the reference.
You should be aware that filling as many fields as possible is important to preserve an accurate library, but above all it is absolutely indispensable to fill in the fields with the exact information required as this will be the information automatically used by EndNote to correctly create your references and citations.
You can search references through online databases and add them to your own personal library.
Online databases are either available from the built-in “Online Search” option of EndNote or through an online library that you can access with your favorite web browser.
Choose the “Online Search Mode” on the toolbar, third icon on the top left corner (see image on Main Window and Basic Toolbar Options section).
Working with “Online Search mode” will allow you to search through online databases and manually select references within the search results in order to add them to your personal library.
If you do not change the mode to “Online Search Mode” every result from your search will be automatically added to your open personal library.
Using the built-in “Online Search” is quiet simple.
Choose the database you would like to explore from the “Online Search” list, a large list of other databases are available by clicking on the item in the list called “more…” (see image on Main Window and Basic Toolbar Options section).
Once you have selected the database to explore, on the right bottom panel you will be able to search any specific reference by filling the search fields with as much information as possible.
The results of your search will appear on the upper right panel.
If you are working on “Online Search Mode”, choose from the search results the reference/s you wish to keep by clicking over it/ them and then on the toolbar button “Copy to local library” and they will be added to your local library.
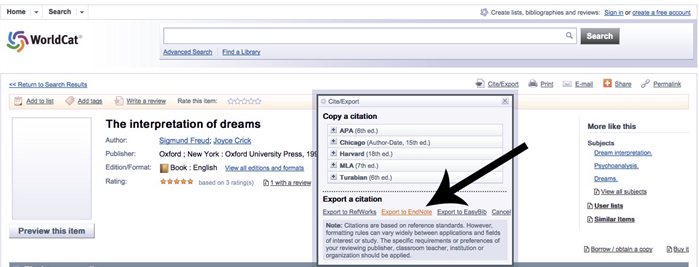
References can be added directly to your EndNote local library from online database webpages such as www.worldcat.org among many others.
Enter to www.worldcat.org from your favorite web browser, make your search and after clicking on your selection on the search results you will find on the upper right corner an option called “Cite/Export”, by clicking on it you will see a pop-up option window where you can find an “Export to EndNote” option.
After choosing “Export to EndNote” it is important to choose “Open with EndNote” (not “Save to”) in order to successfully add anew reference to your library.
You can preview your references in your local library or any “Online Search” results by clicking over the reference and then selecting the Preview panel that you can find in the right-bottom panel (see image on Main Window and Basic Toolbar Options section).
Bibliographic output styles can be modified and previewed by changing them in the main toolbar (you can find it on the left side of the toolbar): just select the desired output style and EndNote will immediately show you the reformatted output inside in the Preview panel.

Using EndNote with Microsoft Word
EndNote is fully integrated with Microsoft Word.
You can search, insert, edit and change output style of citations directly from your EndNote library into Microsoft Word.
After installing EndNote X5 a toolbar will be added to your Microsoft Word application.
This toolbar will allow you to quickly and easily search references from your EndNote library and insert citations to your current working document on Microsoft Word.
You will also be able to modify the bibliographic output style of all your citations added to your document.
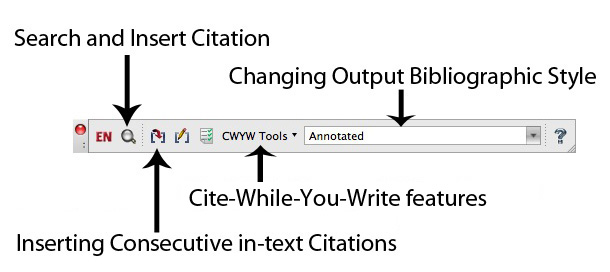
You can search and then add citations from your EndNote references library by clicking on the second icon on the left of EndNote toolbar inside Microsoft Word (see image in EndNote toolbar inside Microsoft Word and its uses section).
This will open a window where you can search your entire EndNote library. After finding your right reference, you should click on it and then click “Insert”. By clicking the arrow next to “Insert” you will be offered other options of how to insert your citation, such as “Insert & Exclude Year”, “Insert in Bibliography Only”, etc.
The Cite-While-You-Write feature allows you to add bibliographic citations while you are writing in your Microsoft Word document. This option is very useful for dynamically adding new bibliography as endnotes, footnotes and/or using Harvard (author-date) style. You will find the Cite-While-You-Write icon in the EndNote toolbar with the following name: “CWYW Tool”.
The EUI library offers twice a year brief trainings on how to use this feature.
To insert consecutive in-text citations (up to 250) you have to make multiple selections in your EndNote library window (by holding cmd+click on Mac or ctrl+click on Windows) and then from your EndNote toolbar inside Microsoft Word click on the third icon on the left. This will insert in your Microsoft Word document all the citations you have selected from your library.
After adding your citations you can easily modify the output bibliographic style if desired or needed.
The output bibliographic style can be changed by selecting it from the second option on the right of your EndNote toolbar inside Microsoft Word (see image in EndNote toolbar inside Microsoft Word and its uses section).
Page last updated on 20 August 2017