How to Get Support via Remote Assistance
For faster response time, EUI Helpdesk operators and/or ICT User Support staff (support team hereafter) may attempt to resolve issues at the time of the service (phone) call, using remote access tools.
Support staff will request and receive the user's consent before accessing the machine remotely [1].
This document details how to receive remote support via TeamViewer QS (Quick Support) tool.
Please Note: Remote Assistance invitations should be sent ONLY if requested by the EUI Helpdesk and/or ICT User Support staff i.e. after opening a ticket and/or after contacting the
EUI Helpdesk via phone. Invitations sent without a valid support ticket will NOT be treated!
- Start the TeamViewer QS tool:
- Depending on your operating system and rights, you may be asked to run and/or to allow the app to make changes to your device: please allow app and changes (you may need to provide credenrtials of an account with full administrator priovilegese on the machine):
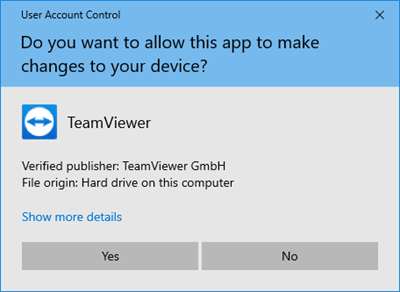
Figure 2: Allowing changes to be made to your machine
- According to your operating system, you may be asked whether you want or not to accept the service Disclaimer:
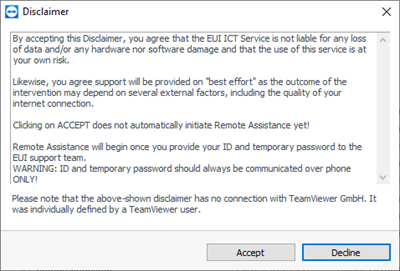
Figure 3: Remote assistance disclaimer
Please be aware by declining the disclaimer, remote assistance service cannot be provided!
- TeamViewer QS will eventually open: wait for the message Ready to connect (secure connection) and for your ID and temporary password to appear on screen:
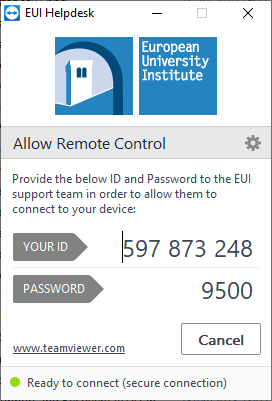
Figure 4: Remote connection ready
The temporary password will be valid for one app session only and will be generated anew with every start of the app. You can force a new pasword by clicking the small circel arrow next to it.
- When asked over phone by the support team, provide your ID and temporary password to start remote assistance.
For security reasons, do NOT send your remote assistance ID/password combination by email!
Likewise, do NOT provide your EUI credentials to the support team but rather enter them on your device/computer whenever requested to by the support team.
WARNING: by providing the temporary password, you implicitly accept to share, with the support team, whatever is shown on your screen/desktop until the support session is disconnected by either side.
The temporary password is valid for one support session only and cannot be used to access the computer/device another time after closing the app.
- Once the support session has started, the support team will be able to see whatever is on your screen/desktop and make use of the mouse and keyboard (if any).
IMPORTANT: at this stage support staff will ONLY be able to see "in real time" your desktop and your activities on the PC. This way you may reproduce an error or show an error message that you have got on screen.
You can follow the support team's activity on screen and, at any time, you may gain back ownership of mouse and keyboard simply by starting to use them.
IMPORTANT: while support staff has control over your desktop, you will be able to see all its activities and you will still be able to intervene directly (for example by moving the mouse away or using keyboard shortcuts).
- Depending on your device, to improve your user experience, you may be able as well to request to start a file transfer, a video or audio chat, etc. from the TeamViewer on-screen console:

Figure 5: Additional remote assistance options
- At any time you can forcibly terminate the support session by clicking on Close (all) connections and/or X icon on the TeamViewer on-screen console.
= If consent is not given, the call will be assigned an appropriate level of priority for subsequent treatment on the spot, if applicable.
Page last updated on 18 June 2025