EUI-WiFi Manual Configuration for MS Windows
The below guide can be followed if MS Windows' automatic configuration fails.
It has been tested on MS Windows 10 Professional and is based on Windows' default wireless configuration tool (Wireless Zero Configuration).
Screenshots are taken from MS Windows 7 thus may slightly differ from other Windows versions.
-
You must have full Administrator rights on Windows;
-
Proper drivers for your wireless network card must already be installed. Windows has a huge list of built-in drivers but if there is none suitable for your card, you should refer to your card vendor's Web site and download the proper one. Advice on installing and setting up your network card can be provided by Portable Device Support;
-
Latest Update for Root Certificates must be installed (check Windows Update for more info);
- Your network card must be enabled and turned on (depending on the make, either via hardware or software switch).
-
Go to any area at the EUI covered by WiFi;
-
Open Control Panel (may look different to below depending on your view, below is Category View) select View network status a tasks:
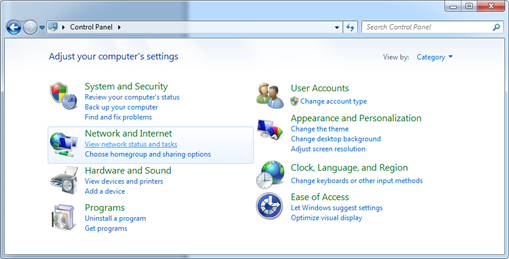
Figure 1: Control Panel
-
Click Manage wireless networks on the left menu:
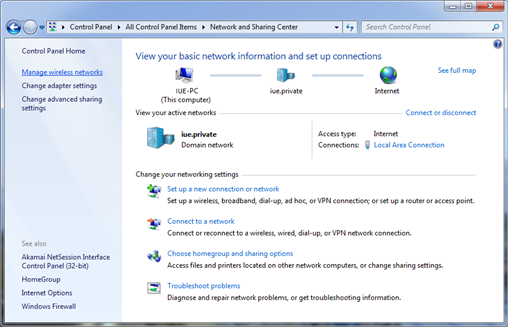
Figure 2: Network and Sharing Center
-
Depending on whether or not the EUI-WiFi network is showing will depend what button you will need to press. If for instance EUI-WiFi is showing like on the following screenshot, then you should select Adapter properties (option 2) and advance to step 8.
Otherwise if the network is not on the list, it will need to be manually created by clicking Add (option 1):

Figure 3: Manage wireless networks
-
Choose Manually create a network profile:
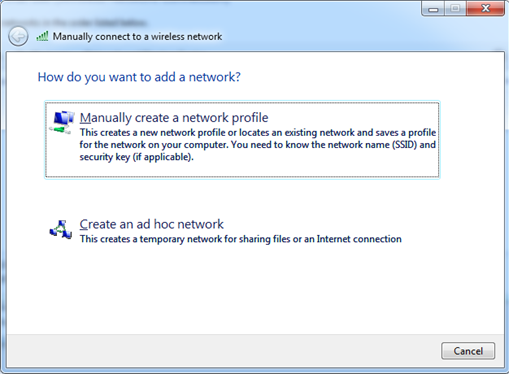
Figure 4: Manually create a wireless network
-
Enter the information exactly as below then continue by clicking Next:
Network name = EUI-WiFi
Security type = WPA2-Enterprise
Encryption type = AES
Security Key = [leave blank]
Start this connection automatically = checked
Connect even if the network is not broadcasting = NOT checked
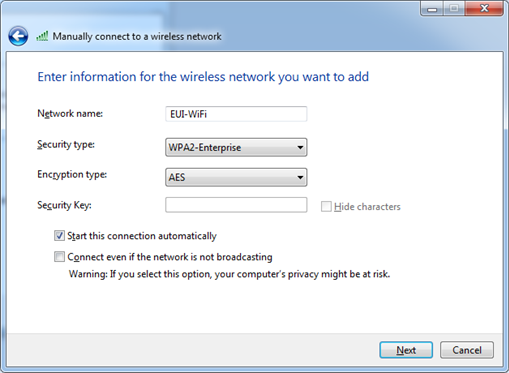
Figure 5: Manually configure wireless network
-
The network profile for EUI-WiFi has been set-up, however security settings need to be configured further. Click Change connection settings:
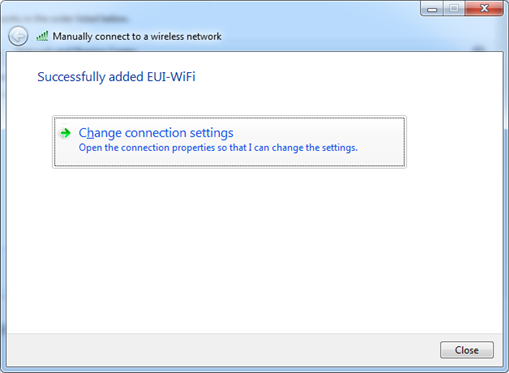
Figure 6: Wireless network successfully added
-
Click the Security tab and configure settings as per below:
Network authentication method = Microsoft: Protected EAP (PEAP)
Remember my credentials (...) = checked
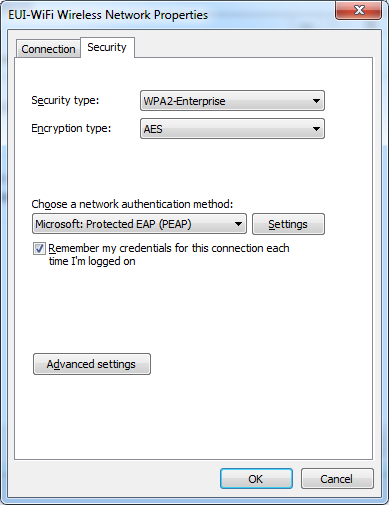
Figure 7: Wireless network security properties
-
Click on Settings to configure the authentication part of the EUI-WiFi network:
Validate server certificate = checked
Connect to these servers = NOT checked
Do not prompt user (...) = NOT checked
Select Authentication Method = Secured password (EAP-MSCHAP v2)
Enable Fast Reconnect = checked
.png)
Figure 8: Protected EAP (PEAP) properties
-
Click on Configure... and be sure NOT to check Automatically use my Windows logon name and password (and domain if any):
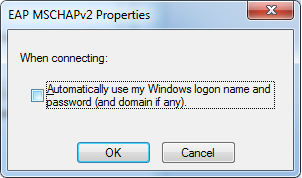
Figure 9: EAP MSCHAPv2 properties
-
Click OK through all the different menus in order to close the Wireless Network Connection Properties, then close the Network Connections window as well.
-
You will notice a pop up menu in the bottom right corner of your screen asking for additional logon information: click on it and enter your credentials as per below (once entered you will not need to do this process again as your login details will be saved):
iuedom\your_EUI_username (for example iuedom\jsmith)
your_EUI_password
Please Note: if iuedom\your_EUI_username fails, put your username without iuedom\ in front.
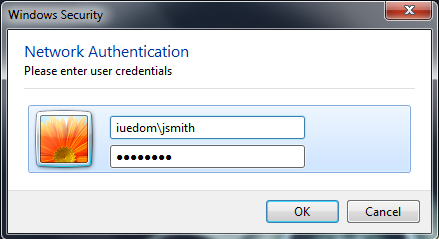
Figure 10: Credential request
-
Click OK to proceed: shortly after, a Windows Security Alert warning will be shown: click Continue to proceed anyway (this is normal and will happen only once):
.png)
Figure 11: Windows Security Alert
You have now succesfully configured Windows to connect to EUI-WiFi.
Your device will automatically connect to the network whenever it is in range and your wireless card is enabled and turned on.
.
Page last updated on 18 June 2025